
TIG Welding Aluminum is the most seek-out topic of all content relating to TIG Welding.
Well aware of that, we made this article to guide you through:
- Important elements in TIG Welding Aluminum.
- The process of how to TIG Welding Aluminum.
- Some common applications of TIG Welding Aluminum.
Let’s wear your glasses and roll down the screen.

Important questions to ask before TIG Welding Aluminum
What current setting to use for TIG Welding Aluminum?
Polarity
Unlike TIG Welding Cast Iron and other materials where DC is utilized, Alternating Current (AC) is the correct polarity to use for TIG Welding Aluminum.
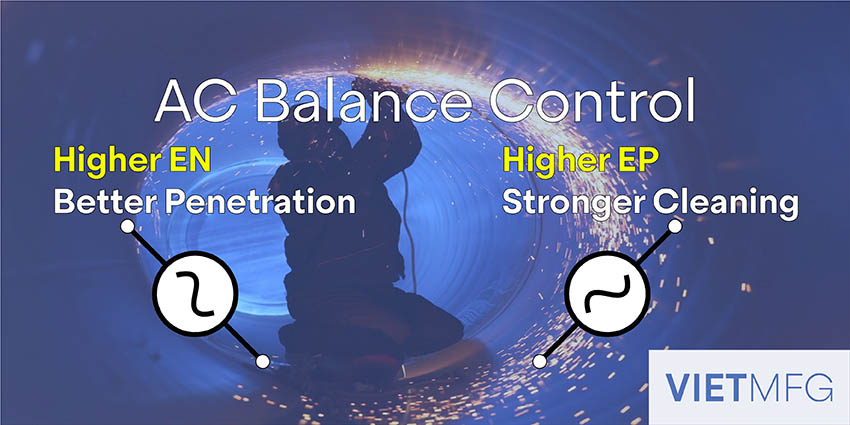
With AC, you get the continuous change in the electrode flow between EN (Electrode Negative) and EP (Electrode Positive):
- EN: provides heat to assist the weld penetration.
- EP: performs the cleaning action of the oxide layer on the aluminum’s surface.
Therefore, AC polarity supplies both the cleaning action (to remove the oxide layer) and the heat required to melt the weld pool.

AC Balance
AC Balance refers to the ratio between EP cycle and EN cycle.
In essence, it shows what you emphasize more in your aluminum TIG welding: cleaning (EP) or penetration (EN).
Old models of TIG Welders have a 50-50 AC Balance.
However, some modern types allow for modifying the AC Balance, in the form of Cleaning Percentage.
One common preset is 75 percent EN to 25 percent EP.
If your weld puddle is filled with small black dots, often called “peppering”, it means your AC Balance is not properly set.
In such cases, increase your Cleaning Percentage (EP) to enhance the removal of the oxide layer, and thus reduce peppering flaw.
But be careful not to switch EP too high, as it puts a huge amount of heat on the tungsten.
This can ball your tungsten tip, and reduce your control over the arc direction and placement.
AC Output Frequency
AC Output Frequency refers to the number of times the power source changes polarity in one second.
The higher the frequency, the more stable the arc is, and thus allow for narrower arc column.
This helps reduce arc wandering, which provides higher precision to your applications, especially in tight areas.

Old models of TIG Welders have AC output frequency of 60 Hz (hertz).
Nowadays, modern equipment has a preset of up to 120 Hz output frequency, or even higher.
For thin aluminum pieces (under 3/8 inch in thickness), use high output frequency (150 – 250 Hz).
For thick aluminum pieces (from 3/8 inch in thickness), lower output frequency (80 – 120 Hz).
Can DC be applied for TIG Welding Aluminum?
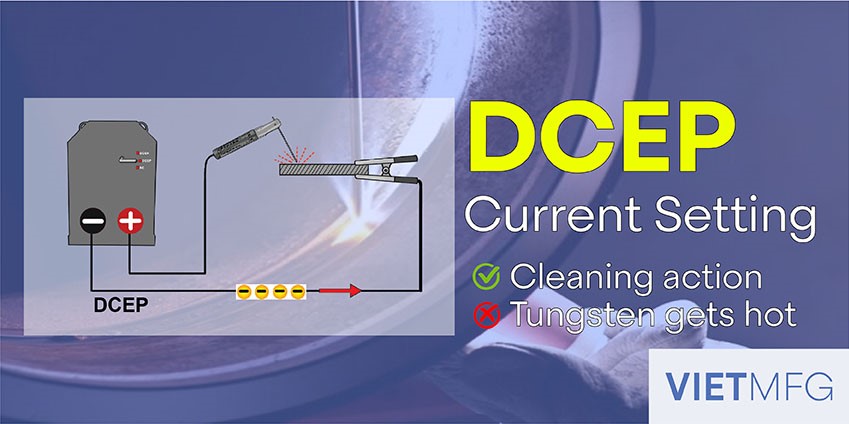
About DC (Direct Current), only DCEP (Direct Current Electrode Positive) can be applied for TIG Welding Aluminum, but very limited.
DCEP can perform the cleaning action to remove the oxide layer on aluminum.
However, as the heat flows from the metal piece onto the electrode, it makes the tungsten get really hot.
When the tungsten gets too much heat, the arc will be unstable and start wandering off.
Moreover, it can cause a ball of the end of the tungsten and dump it into the weld puddle, causing contamination.
What amperage range to use during TIG Welding Aluminum?
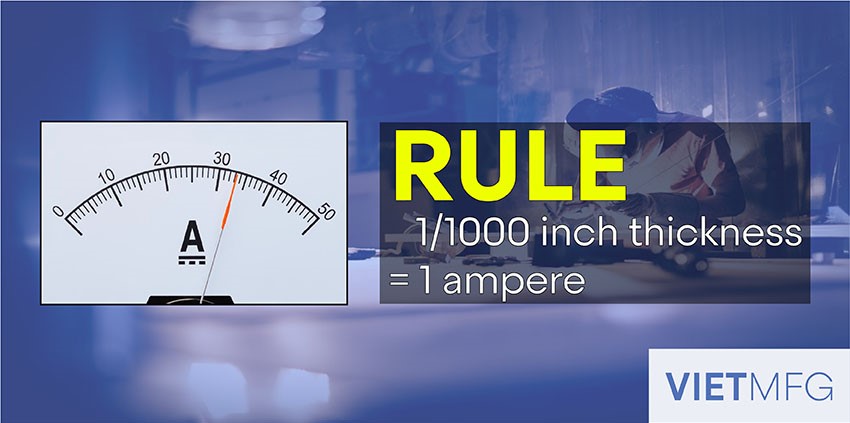
One important rule for choosing proper amperage for TIG Welding Aluminum is to use 1 ampere for every thousandth (1/1000) of the aluminum thickness.
For example, to TIG weld an aluminum piece that is 1/8 inch in thickness would require 125 amperes.
However, as the thickness of the base material is higher, the above rule is no longer correct.
If you weld a 3/8 inch piece of aluminum, you only need a power source of 280 amperes (not 375 amperes, as per the rule).
Also, the amperage also depends on the type of joints.
For example, a T-joint would demand higher power source than a Butt joint, because:
- In T-joint, heat can flow in three directions,
- While in Butt joint, heat flows in two directions only.

To set the desired amperage, you can:
- Make use of foot pedal or fingertip
- Rely on your TIG Welder by changing AC Balance (increasing EN), or set AC amperage independently (if allowed by the machines).
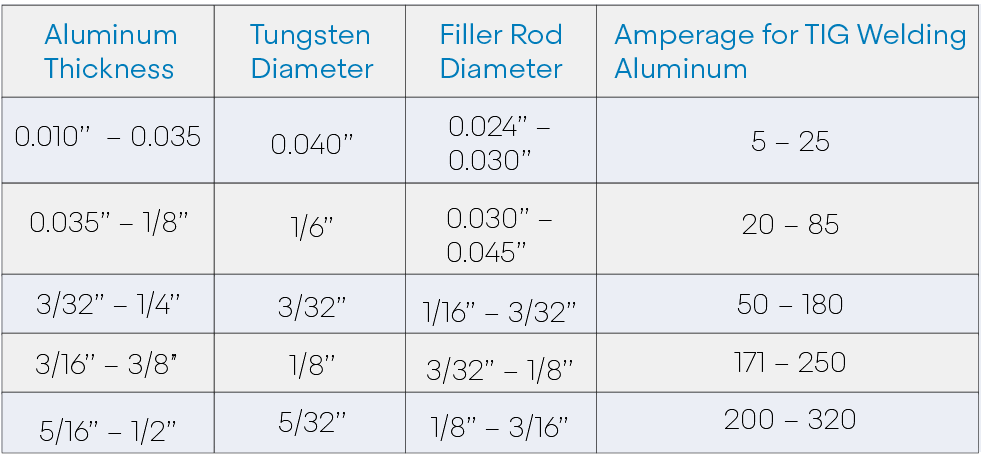
Below is a Amperage Chart for your reference
What Shielding gas to use for TIG Welding Aluminum? (type, gas flow – cfh)
Shielding Gas Type
Regarding TIG Welding Gas, Pure Argon is still the most favorite when it comes to TIG Welding Aluminum, especially for thin applications (less than 1/2 inch).
For thicker base metal (from 1/2 inch), using a mixture of Argon and Helium is highly recommended.
The addition of Helium makes your arc hotter, and thus improves weld penetration.
Depending on the thickness of your aluminum piece, you can choose 25 percent Helium or 50 percent Helium.

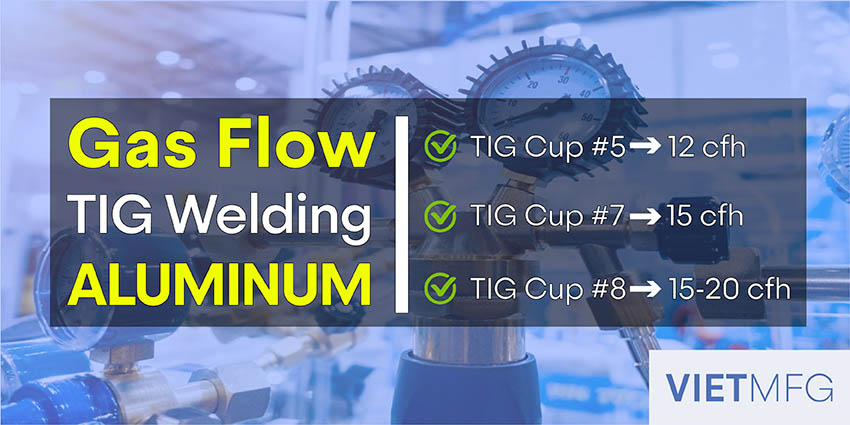
Proper Gas flow
The amount of gas flow is closely related to the cup size that you use.
It is usually based on experience, through many experiments around it.
For reference, for a TIG cup with size 7/16 inch needs about 15 cfh of gas flow.
Or a number 8 cup would require 15 to 20 cfh.
When your cup size drops down to a number 5, you would need only 12 cfh in this example.
What tungsten electrode to use for TIG Welding Aluminum?
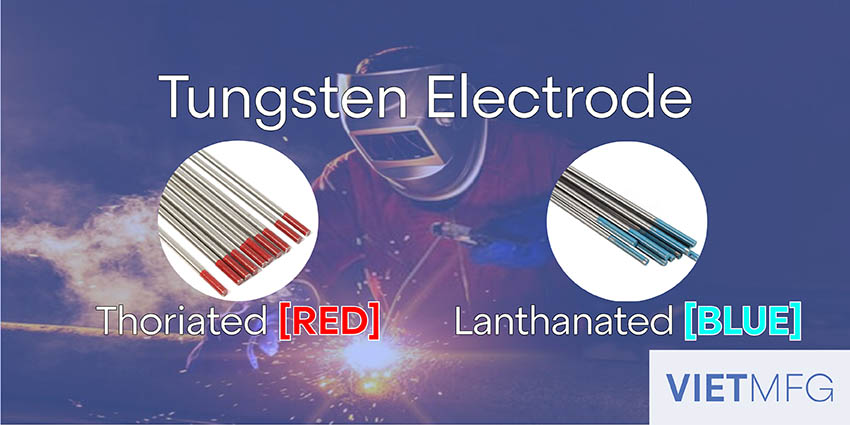
Correct Tungsten Electrode Type
The 2 percent thoriated and 2 percent lanthanated tungsten electrodes can be of good use for TIG Welding Aluminum.
However, between the two, 2 percent lanthanated is more favorable, as it contains no radiation.
These tungsten can perform well on AC, and can operate at high amperages.
For TIG Welding Aluminum, Pure Tungsten is NOT recommended.
Proper Tungsten Diameter
One common recommendation is to use a 1/8 inch tungsten electrode when working with aluminum.
This tungsten size provides enough heat and can maintain a stable arc throughout your welding session.
Other options when TIG welding aluminum with 2 percent lanthanated electrode include 3/16 inch and 3/32 inch types.
Tungsten Geometry
About tungsten geometry, electrodes with balled-tips are suitable.
Usually, this ball should be 1 to 1.5 times the diameter of the tungsten electrode.
Before starting TIG welding aluminum on AC, use reverse polarity (DCEP) to heat the tungsten and form a balled-tip.
After having the ball at the tip of the tungsten, simply switch your TIG welder to AC and start your welding session with aluminum.

What torch angle to hold during TIG Welding Aluminum?
You should maintain a torch angle of about 15 degrees during TIG Welding Aluminum.
This torch angle has two benefits:
- Firstly, it does not block your view on what is going on at the puddle.
- Secondly, it does not tilt too much that can affect your gas coverage or create arc wandering.

Actually, the perfect angle is straight up and down, as it gives you a symmetrical puddle and helps you add filler rod at almost any angle.
However, you cannot see your puddle if you hold the torch straight.
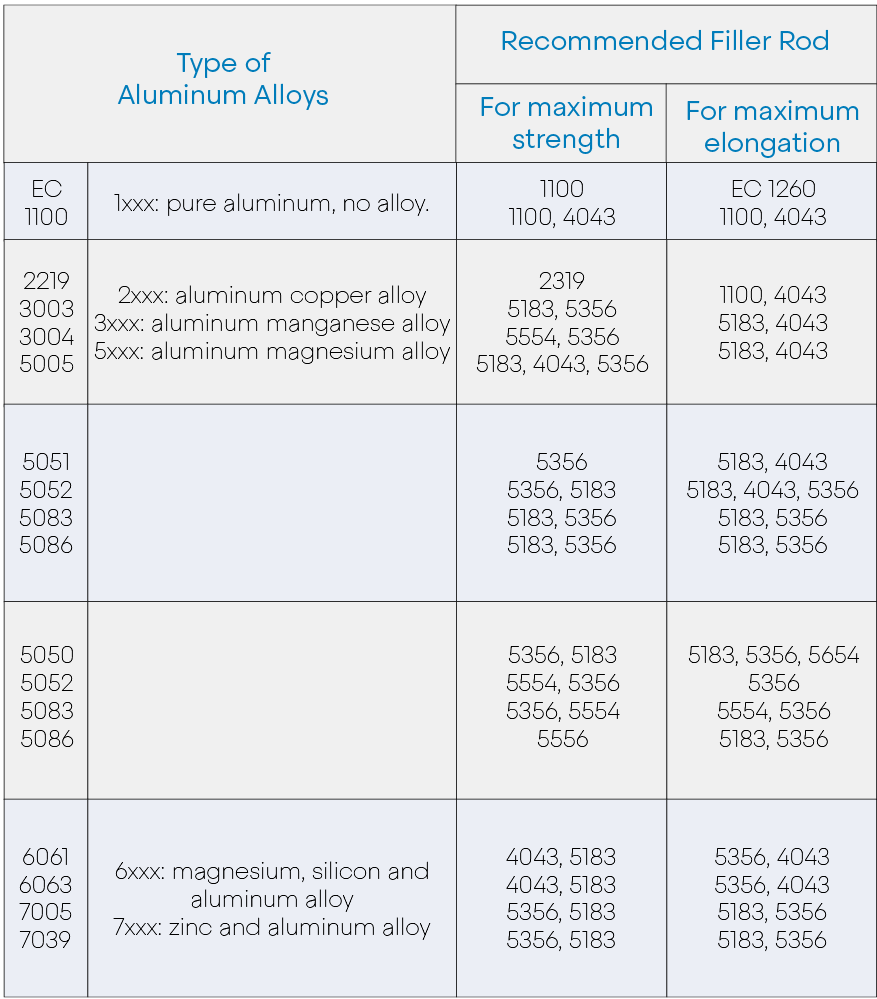
What material should the filler rod be?

4043 filler rod is considered the best selection out there, both in terms of strength and elongation (lengthen).
Below are suggestions for choosing proper filler rod for your TIG Welding Aluminum:
Whatever type of filler rod you choose, your filler rod must be clean and of high quality.
If the rod is contaminated, its contamination can enter the weld pool and cause failure to your application.
Contaminants on filler rod include oil, or a hydrated oxide.
Simple 5-step process on how to TIG Weld Aluminum
In this section, we will introduce a simple 5-step process of how aluminum is TIG welded.
The steps are as follows:
- Step 1: Clean your Aluminum
- Step 2: Setup your Welder
- Step 3: Initiate the arc and perform the cleaning action
- Step 4: Form the weld puddle and add filler rod
- Step 5: Taper off and finish your TIG welds

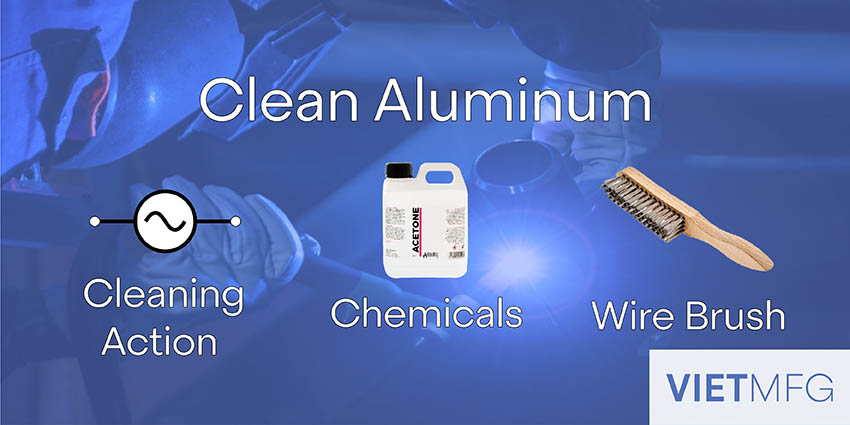
Step 1: Clean your Aluminum
Cleaning your aluminum piece means getting rid of the oxide layer on the metal.
This step is the most important part of the whole process.
The cleaning is required because of the difference in the melting point of the oxide layer and aluminum itself:
- Aluminum melts at around 1,200 degrees Fahrenheit,
- While its oxide layer melts at over 3,200 degrees Fahrenheit.
If not removed, when TIG welding at high heat, the oxide layer would just sit there like a skin, while the aluminum inside would melt away.
There are three ways that you can use to clean the aluminum’s oxide layer:
- Use cleaning action from AC settings (adjusting the AC balance).
- Use chemicals such as acetone or other cleaning solvents.
- Use mechanical equipment, such as a wire brush.
Please remember that changing the balance control cannot replace the proper aluminum cleaning.
The reason is because there are many contaminants that can only be removed by chemicals or mechanical tools, such as oils, hydrocarbons or residual tapes.
Step 2: Setup your Welder for TIG Welding Aluminum
You should get used to the menus of your welder machine.
Certain configurations to watch out for includes:
- Setting the welding amperage.
- Choosing current polarity (use DCEP for balling tungsten, then switch to AC for TIG welding aluminum).
- Modifying the cleaning percent.
- Adjusting the AC output frequency.

Step 3: Initiate the arc and perform the cleaning action
After balling up your tungsten tip, switch polarity to AC and you are good to go.
Hold the torch firmly with a torch angle of about 15 degrees and keep the tungsten close to the aluminum piece (around the tungsten diameter).
When ready, initiate the arc.
This will activate the cleaning action immediately, as you will see your metal piece cook away and create a frosty-looking.

Please remember to wear TIG gloves on, as this process can get pretty hot.
Step 4: Form the weld puddle and add filler rod
After around 1 to 2 seconds, a shiny wet puddle will form, as the oxide layer is being removed.
When you see this shiny wet puddle, start moving your torch, slowly but steadily.
Try to move the torch along the weld in even spaces, roughly around 1/8 inch and dab the filler rod in the puddle.
To dab the filler rod to the puddle, grip the rod between the first two fingers and alternatively pinch it with your thumb.

Please note that only dab the filler rod at the base of the puddle, not the puddle’s center or you will contaminate the tungsten electrode.
Keep the arc length short by holding the torch close to the metal piece so that the weld is covered well in argon.
If you do everything correctly, you should get even ripples on your weld.
Control your heat by adjusting your foot pedal to make sure you have a proper amperage amount on your applications.
One small tip during TIG welding aluminum is to raise the torch a little bit to extend your arc length, because the puddle can change in height when being added with filler rod.
If not raising your torch, the puddle can jump onto the tungsten and contaminate it.
Also, the torch and the filler rod should form a 90 degrees angle to each other.
In short, during your bead runs, make sure the hand holding the torch slides smoothly and steadily, while the other hand dabs the filler metal.
Step 5: Taper off and finish your TIG welds
When reaching the end of your welds, do not stop immediately.
Add a little more filler rod to the end tack, some pro fabricators usually swirl or move the torch around for a little while, as they taper off.
Otherwise, you can get a crater hole in your weld.
Conclusion
You have gone over every basic point about TIG Welding Aluminum.
Aluminum is a tricky material to perform TIG Welding on, as not all professional TIG welders can create a good Aluminum TIG weld.
This process is what sets the fabricators apart.
However, do not be discouraged.
Just follow every guide in this article, and keep practicing and you can surely nail it.
Reference
- Welding Principles and Practices (5th Edition) – McGraw Hill Education. Edward R.Bohnart. [2017]
- How to TIG weld aluminum. The Fabricator. Retrieved August 16th 2020.
- TIG Welding Aluminum. Lincoln Electric. Retrieved August 16th 2020.
- TIG Welding Aluminum: Tips and Techniques. Weldguru. Retrieved August 16th 2020.
- TIG Welding Aluminum for Beginners: Step 1 & 2. Miller Welds. Retrieved August 17th 2020.
- TIG Welding Aluminum for Beginners: Step 3 & 4. Miller Welds. Retrieved August 17th 2020.
- 10 most common mistakes made while TIG welding aluminum. Longevity Incorporates. Retrieved August 17th 2020.
- Welding Tips and Tricks (Youtube Channel).
- Weld.com (Youtube Channel).

